Navigating Fields With a PowerMic
This is a quick instructional guide on how to program the buttons on your PowerMic® II. The specific function we’re aiming for is to move back and forth between voice fields in a Dragon® template.
Before Getting Started
Just a few things to cover before we proceed:
1. If you’re not sure if you have a PowerMic II, compare your device to the picture at the top of this article. These steps don’t work with other mics
2. If you don’t know what a voice field is, it’s also known as a:
- variable field
- variable voice field
- voice variable field
- variable
- template field
- default value
3. To see how a variable field gets used in a template:
- Open up the DragonBar in Dragon® Medical Practice Edition v2.
- Go to Tools > Command Browser > Medical Templates and open the “Dragon Soap Template.”
- In the “Content” field at the bottom, the variables are the bracketed numbers: [01], [02], [03] and so on.
Programming the PowerMic
The goal is to teach you a simple way to move from one variable to the next, dictating the text you need for each field and jumping to the next with ease. The following steps will allow you to skip back and forth between variable fields using two buttons on your PowerMic II.
Procedure
1. Make sure the PowerMic II is plugged in. Open DMPE 2.
2. Click Profile > Open User Profile and select a profile with the source “PowerMic II Microphone.” If you don’t have one available, you’ll need to create one. Click here for instructions.
3. Click “Open” and allow the profile to load. Then click Tools > Options and select the “PowerMic II” tab.
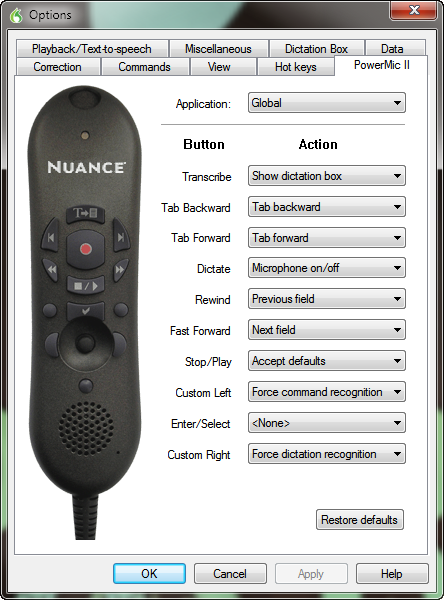
4. You should see a picture of the front of your PowerMic II. Find the topmost button on the left and hover your mouse cursor over it.
5. A notification should pop up indicating that the button is called “Tab Backward.” The button directly across from it is called “Tab forward.” These are going to be your “Previous Field” and “Next Field” buttons.
6. Open the “Tab Backward” drop-down menu on the right-hand side of the window, and select Navigation > Previous Field.
7. Do the same for the “Tab Forward” menu, but select Navigation > Next Field.
8. Click “Apply” and “OK.”
9. Open a template with variable fields and test out the button functionality.
Conclusion
You should now be able to navigate voice fields using only your PowerMic II. If you’re working in multi-field templates, you’ll probably notice an increase in speed, and an overall smoother experience.


