This step by step guide walks you through the process of how to enable the USB driver for the SpeechMike will go into a strange loop that requires a rather unusual process in order to get the drivers to load. Illustrated screen shots have been included for your convenience.
NOTE: SpeechMike II’s can only be upgraded (firmware) on computers running Windows XP 32bit.
STEP 1: Connect your SpeechMike to a USB port on your computer
Once you have connected your SpeechMike you should hear the (mee beep) as the USB driver enumerates. After this, you may see a MS Windows message that says ‘you must restart your computer to apply these changes’. Do not do this. Choose, ‘Restart Later’. Now, locate the directory that contains your firmware upgrade.

Note: When the wizard has an issue finding the device, do not fret. It happens from time to time. This is where this document comes in handy. What happens is sometimes, when there is an interruption during the upgrade process. Click next and we will move to Step 2.
STEP 2: Attempt to Connect the Device Using the Firmware Upgrade Wizard
Disconnect your Speech Mike and hold down the two buttons on the top right of the Speech Mike. Insert the Speech Mike cord into the USB port. Hopefully all buttons will light up, putting the device in upgrade mode. Now you can release the buttons and move through the wizard. If not, do not fret. We will have to do some other things. 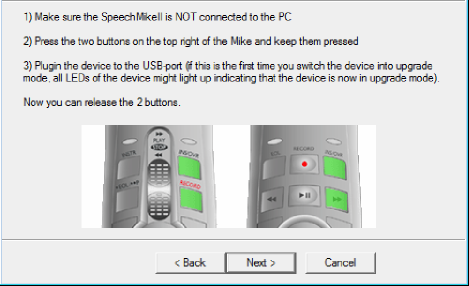
STEP 3: Attempt to Connect the Device Using the Firmware Upgrade Wizard (but remains in >’Waiting to be available ….’)
So you are now in this waiting mode, which is a bummer however you are not without hope. Cancel out of the Firmware Install Wizard, Driver Installation Page. We now have to reset some things in windows. Note: Do not worry however in this state, your SpeechMike is dead in the water. Let’s move to Step 4.

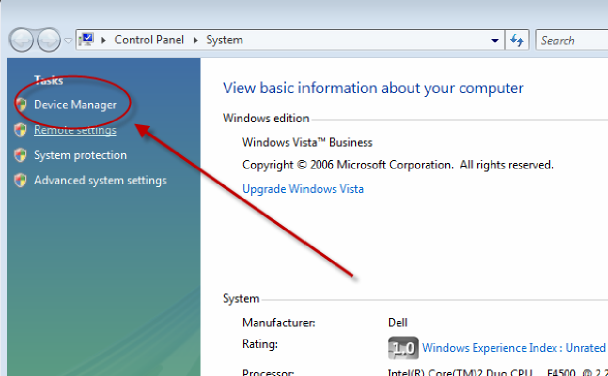
STEP 4: Go to Device Manager and uninstall the USB driver so that you able to start over with the Firmware Install Wizard
Go to the device manager by going to ‘My Computer, right clicking, and choosing properties. Under Tasks, Choose Device Manager. Once in Device Manager, look under Universal Serial Bus controllers for the TI DFU Class Driver 5. Right click and uninstall.

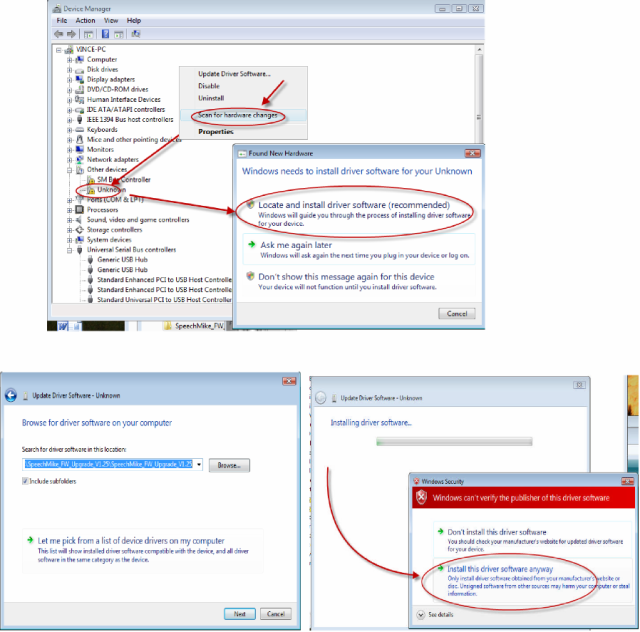
STEP 5: Clean Install of TI DFU Class Driver 5 after deleting it from Device Manager
Insert the Speech Mike into USB port and look in Device Manager for ‘Unknown’, under [Other Devices]. Right click and select ‘Scan for hardware changes’. After that a box will pop up prompting you for what it should do next. Choose ‘Locate and install driver software’. Browse to the location of your Firmware installation and choose the directory that contains the file, [DFUUSB.sys]
STEP 6: After the driver installs successfully from the Firmware Upgrade Wizard, you are good to go. Enjoy!
Go to your Philips Speech Exec software and start using your SpeechMike.
Verification Source: Rick Maxwell, Philips Product Specialist & In-house testing