This guide will walk you through the process of programming a Philips SpeechMike for use with Dragon NaturallySpeaking v10. The SpeechMike will allow you to program text or hotkeys (shortcuts) or a combination of both for each button on your SpeechMike and assign the commands to almost any Windows application. Separate commands can be programmed for when each button is pressed alone, as well as for when each button is pressed together with the [Ctrl] & [Shift] keys on your keyboard. Being that Dragon NaturallySpeaking uses commands; you can program the Philips SpeechMike to invoke various commands.
STEP 1: Open the Philips SpeechMike Control Application & Program the Buttons.
For this step, we will program two of the buttons on the Philips SpeechMike. One, to control the microphone in Dragon NaturallySpeaking v10, and the other to jump to the next field in our template. To do this:
1. Go to [Start]> [All Programs]> [SpeechMike Driver Utility]> [Control Application].
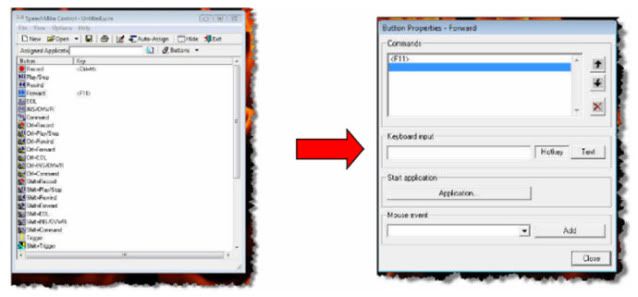
2. The SpeechMike Control window will open. Double-clicking on the button icon will open the Button Properties dialog box. This is how you can program the buttons.
3. Program the Record button as well as the Forward button. To program the keys, enter your hotkey on the [Keyboard Input] field. Program the Record button to [Ctrl+M] and program the Forward button to [F11] as shown below
4. Once you have programmed both buttons, save the file by going to [File]> [Save as]. Name it & save it wherever you’d like.
STEP 2: Open Dragon NaturallySpeaking v10 & Re-assign the Microphone on/off hotkeyFor this step, we will open Dragon NaturallySpeaking and re-assign the hotkey to allow us to turn the microphone on and off with the Philips SpeechMike
1. Go to [Start]> [All Programs]> [Dragon v10]> [Dragon NaturallySpeaking v10].
2. Once Dragon is open, go to [Tools]> [Options] > [Hotkeys]
3. You will now be in the DNS Options menu, as illustrated below, you will see several buttons with hotkeys assigned to them by default. Click on the top button titled [Microphone on/off]
4. A Set Hot Key window will open. Press [Ctrl+M], then [OK].

5. Press [OK] to exit the Options Menu
STEP 3: Create a Text & Graphic Custom Command with Variable Fields.
This is the step where we create a template within Dragon NaturallySpeaking v1 0 by inserting text and variable fields. The content of the template can be whatever you’d like.
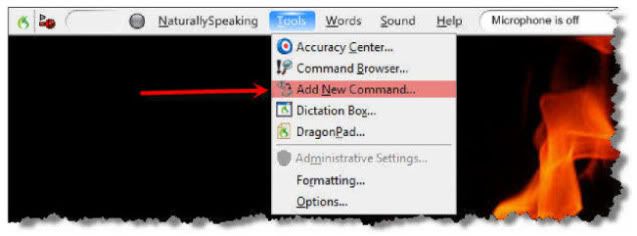
1. On the DragonBar, go to [Tools] > [Add New Command] or verbally by sayingadd new command.
2. The MyCommands Editor will open. In the [MyCommand Name] field, enter what you will say to launch the command. Choose a phrase that is easy to remember but not likely to be used in normal dictation. The example below isinsert template
3. Click [Train] to teach Dragon the pronunciation of the command.
4. In the [Description] field, enter a description that will help you identify the command.
5. In the [Group] list, specify whether this command will be a Dragon command or a user-defined command. If it’s user-defined, you can type overUser-defined with the group name of your choice. The new group name will appear in the list the next time you create a command.
6. Specify whether the command will work everywhere (Global), or only in a specific application which you name, or in a specific window, which you will specify.

7. In the [Content] box, enter the text and/or graphics that you want in your new template.8. To insert a Voice Field, click the [Variable] button. Voice Fields are variable fields where the user can later type or dictatenext variable or previous variable to navigate through those fields.
By default, each Voice Field variable displays as [default value]. To change the default value of the Voice Fields, edit the text between the variable delimiters (the [] brackets).

9. Click [Save]
STEP 4: Create a Step by Step Custom Command within Dragon NaturallySpeaking v10.
In this step, we will create a macro within Dragon NaturallySpeaking that will allow us to press a hotkey on the Philips SpeechMike to navigate through to the next fields in our template.

2. In the [MyCommand Name] field, enter the name of the custom command.
3. In the [Description] field, enter a description for this custom command.
4. In the [Group] field, place your custom command in a group. Putting custom commands in a group will make them easier to find and manage within the Command Browser.

5. In the [Command Type] list, select to [Step-by-Step].6. Go to the [New Step] window and select the [Keystroke].

There are 8 different types of steps can be set within a Step-by-Step macro.
7. Insert your step by clicking the [Insert] button. 
8. A Send Keystrokes window will appear, press [F11]. Click [OK] when finished
9. Click [Save]
STEP 5: Record a Macro within Microsoft Word
This is our final step. We will create a macro within Microsoft Word to invoke a Find & Replace. This will allow us to press the Forward button on the Philips SpeechMike to navigate to the next field in our template.
1. Record a Macro within Microsoft Word®. The term ‘macro’ is often used synonymously with ‘keyboard shortcut’. Keyboard shortcuts are key combinations that perform commands, such as saving a file, closing a window, or copying and pasting data.
2. Open Microsoft Word, go to [Tools] > [Macro]> [Record New Macro]. A Record Macro dialog window will open. Give the macro a name, then assign the macro to a Keyboard, upon clicking the Keyboard icon, a separate window will appear, press [F11] in the New Shortcut Key box, click [Assign] then [Close].
3. Once you click [Close], a Record Box will appear. When this icon appears, it means that Microsoft Word® is ready to record your macro. In this ‘how to’ guide, we will command Word to perform a [Find and Replace] each time the [F11] key is pressed. To do this:
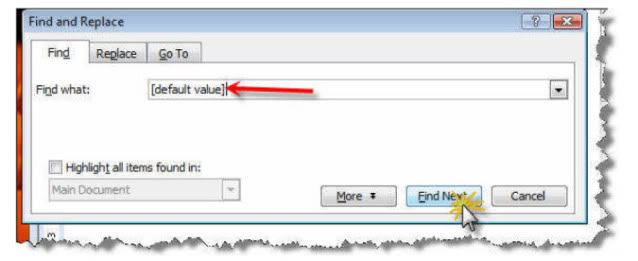
4. Press [Ctrl+F]. A find & replace window will appear.
5. In the [Find what], enter the [default value]. Once completed, press [Enter], then close the Find and Place box by clicking on the red X in the top right corner. You will be returned to your Word document, Press the [Stop] button, in the record box.
CONGRATULATIONS! You can now use the Philips SpeechMike to control the microphone within Dragon NaturallySpeaking. You can also start your template by voice and navigate through the fields by pressing the Forward button.
Verification Source: In-house testing
Test Date: 2.21.10