
How to Change the Busy Detection Level on a Philips LHF-9850
WALKTHROUGH GUIDE #223
This set-up guide walks you through the process of how the busy detection level on a Philips LHF9850. Illustrated screen shots have been included for your convenience.
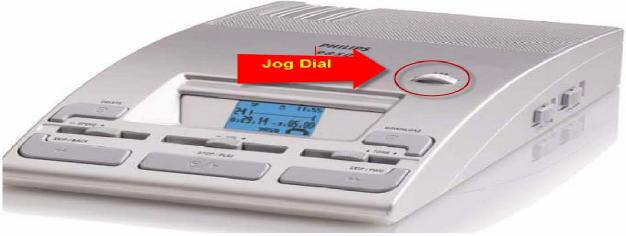
STEP 1: Access the Menu by going to the Jog Dial
1. Make sure the recorder is in [Stop Mode], then go to the [Jog Dial] and press it down for about two seconds. The menu can only be accessed when the recorder is in [Stop Mode].
STEP 2: Select Level in the Busy Menu Selection
1. Move the Jog Dial to the right until you see the selection [Busy]. Push down. Jog to the right to select 1 thru 5 as levels of Busy Detection. Once you have scrolled to the level you want, press down on the jog dial to select it. After 10 seconds of inactivity, the recorder will exit the menu and revert back to [Stop Mode]. The following is a list and definition of each level.
1. For short busy signals (some seconds), easy detection, also if user is whistling for about 4 seconds
2. Longer analysis of busy signal, default level, should be adjusted forstandard” busy signals
3. Use this level if hang-up occurs without busy signal (in case of misinterpretation with level 2)
4. A long selective detection of busy, only if duration of busy-signal is longer than 10 seconds.
5.