
One of the new features in Olympus’s Dictation Management System (ODMS) is enhanced Dragon NaturallySpeaking support. This means users can users can use real-time speech recognition within the Olympus application. This guide will show you how to configure the Olympus software to communicate with Dragon NaturallySpeaking v11 and higher. Illustrated screen shots have been included for your convenience. I have written this guide with the assumption that you have both Dragon NaturallySpeaking and ODMS installed.
STEP 1: Create your profile(s) within Dragon NaturallySpeaking
If you have not done so already, you’ll need to create a user profile within Dragon. Olympus supports real-time and background voice recognition, therefore; you can dictate using their DirectRec II USB microphone and/or one of their digital voice recorders.
You will need to create a profile in Dragon for each dictation source you intend on using. For this guide, I will be using the Olympus DirectRec DR-2300 USB Microphone as well as the Olympus DS-7000 Digital Voice Recorder; therefore, I will create a profile in Dragon for each source.
NOTE: Go to Step 2 if you’ve already created the necessary profiles within Dragon NaturallySpeaking.
1. USB Source: Open Dragon, if this is your first time opening Dragon, a Profile Creation wizard will assist you with creating your user profile; be sure to select USB Microphone as your dictation source.
NOTE: If you already have a profile in Dragon but it’s for another dictation source, I would recommend adding a new dictation source to that profile, rather than starting from scratch. CLICK HERE for instructions on adding additional dictation sources,
2. DVR Source: CLICK HERE for instructions on creating a mobile profile within Dragon NaturallySpeaking.

3. Once you have created your profiles, close Dragon NaturallySpeaking by going to Profile > Exit Dragon.
STEP 2: Assign Author IDs
The Author ID is the name of the device. When using speech recognition, you need to make sure that the name of the device matches the name of the Dragon profile(s) you created in step 1.
1. Connect your Olympus device to your computer.
2. Open the Olympus ODMS (generally, it will automatically open when you an Olympus device have been connected). On the Menu bar, go to Tools > Options.
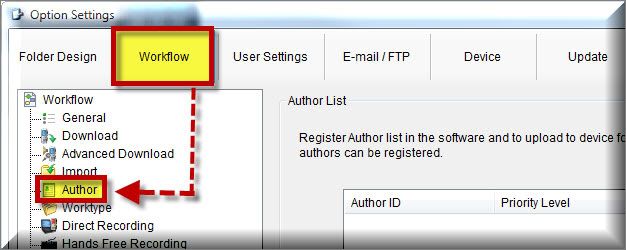
3. The Option Settings dialog window will open, select the Workflow > Author.
4. On the right panel, select [Add].
5. An Author Property window will appear, enter your Author ID then select [OK].

6. You will be brought back to the Option Settings window. You should now see your name listed under the Author ID column.
7. Select the Device > Author List.

8. Select [Update] then [All Pages] to send these settings to the device.

STEP 3: Enable Voice Recognition
We will now tell the Olympus Dictation Management System to communicate with Dragon NaturallySpeaking.
1. Within the ODMS, select Voice Recognition > Voice Recognition Settings.

2. You will be redirected to the Voice Recognition section of the Option Settings. On the right panel, select [Enable Voice Recognition Features]. Once enabled, select [Go to Profile Creation].

3. You will be prompted to select your Dragon NaturallySpeaking User Profile. For this guide, I am using a local profile, therefore; I will select [Use Local Profile].
CLICK HERE for more information on creating Roaming profiles.
4. Selecting Use Local Profile activated Dragon in the background and pulled in your user profile information. Select the User Name, Vocabulary and Dictation Source options then select [Apply].
NOTE: For Real-time voice recognition, you should select [Microphone USB] and [Digital Recorder (Audio Files)] for background voice recognition.

5. Congratulations, you have configured your Olympus Dictation Management System to perform real-time and background voice recognition.
Verification Source: In-house testing
Test Date: 4.18.12